Friday, December 31, 2010

Science of Air Pressure #2


Every week, Madison (my 10-year old daughter) and I teach a 1.5-hour afterschool science club for K-2nd graders.  Each week she helps plan the lesson and then we write the blog about what we did. 

We learned most of the science experiments and activities from Steve Spangler (awesome speaker and science guy extraordinaire).  We have included links to his science supplies, experiments, and videos.  We also include links to our YouTube videos and other products that we used. These links take you away from the blog and to external websites.

Lesson 5
Science of Air Pressure II

Science Standards Addressed
  • Observe that things (air) move in different ways.
  • Describe the characteristics of the 3 states of matter.
  • Know that air takes up space and exerts a force.

Plus we snuck in some speaking and listening standards like asking questions, expressing ideas, following multi-step directions, and participating in discussions.


10 minutes
As the children arrived we played the songs In the Air Tonight, by Phil Collins, and The Air that I Breathe, by the Hollies.

Next we had a snack that once again was a hint of the science to follow.  
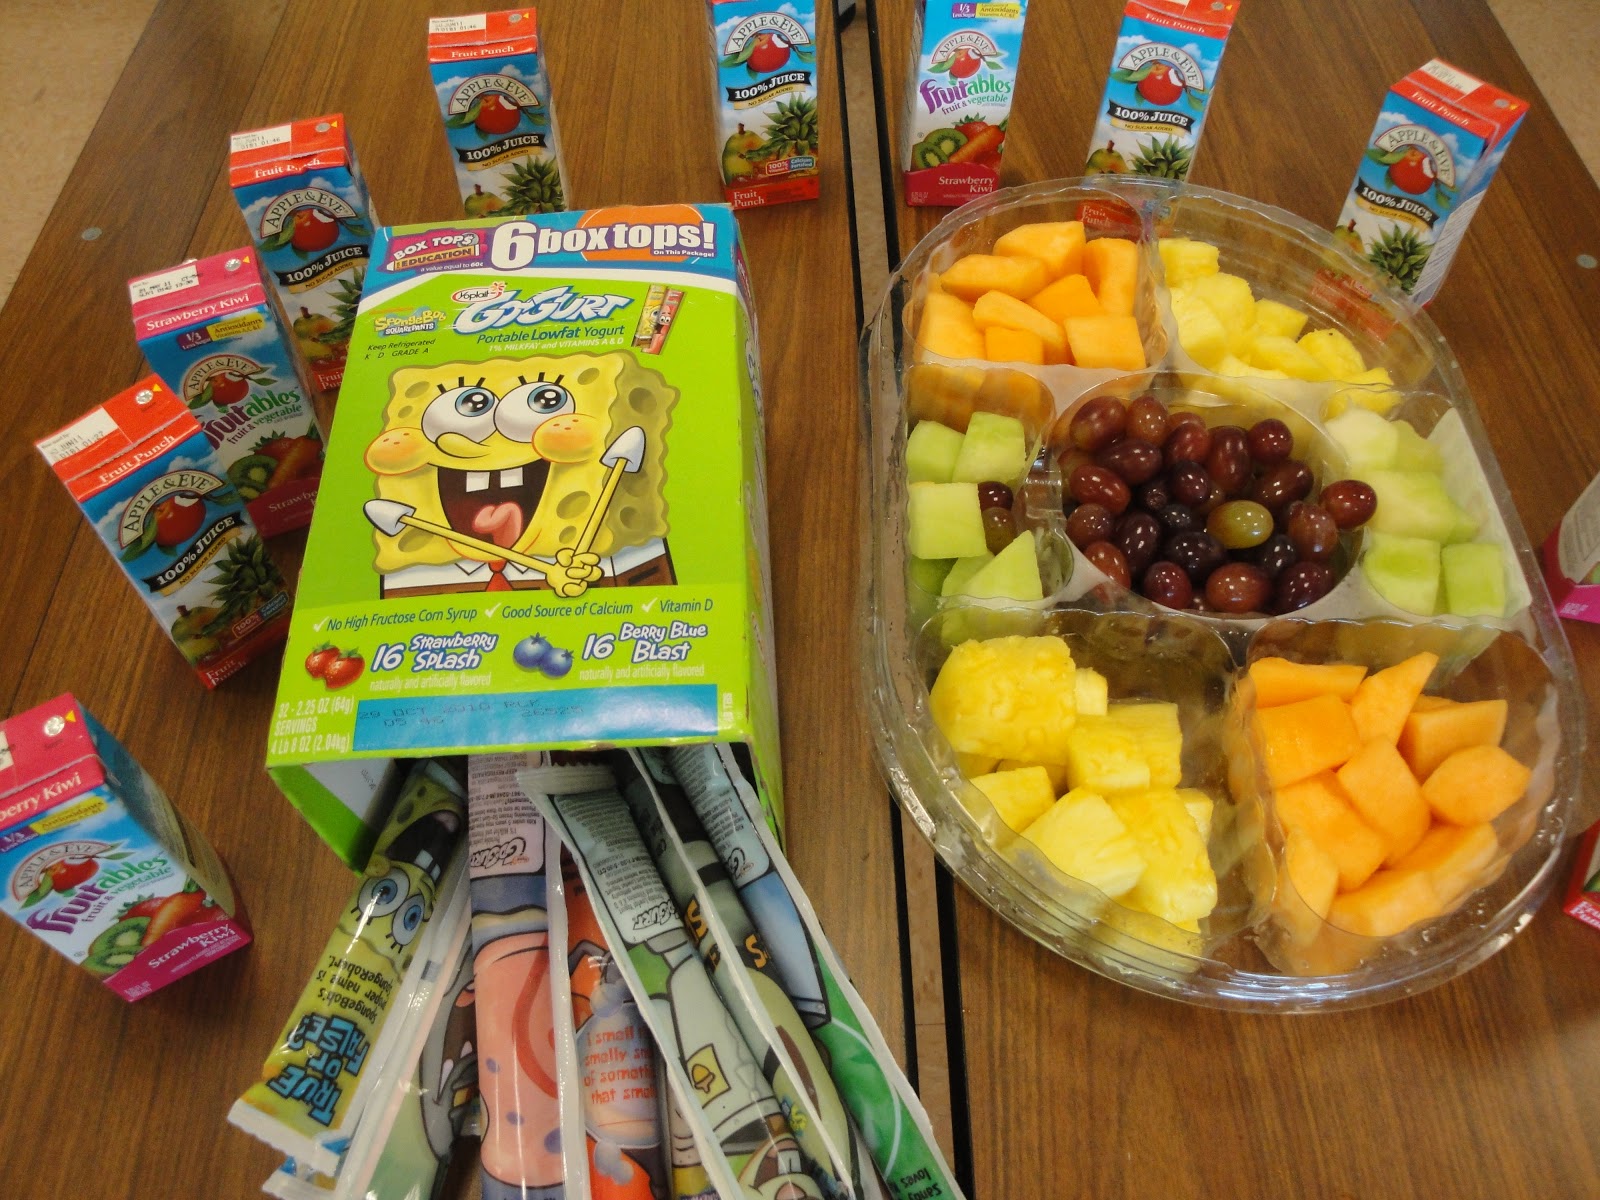
In addition to the healthy stuff, we snacked on
marshmallows (full of air) and AIR Heads!
 
To prime their brains, as they drank their juice (with straws) we taught them that they weren’t actually sucking juice into their mouths.  

They were decreasing the air pressure in their mouths (partial vacuum), so that the atmospheric pressure could push the juice up the straw and into their mouths.

While we ate, Madison read 

Curious George and the Hot Air Balloon by Margret and H.A. Rey
a book about George the monkey who, because of curiosity, accidently unhooked a hot-air balloon and sailed away. He flew past George Washington’s nose on Mt. Rushmore. In the end he saved a stranded worker; George was a hero!

It also contains an accurate depiction of how they use Bernoulli's Principle to inflate a hot-air balloon.

10 Minutes
Mysterious Water Suspension
To really engage the kids, we started with a really exciting demo.  We asked them to watch carefully and to predict what might happen next.  We filled a glass jar to the rim with water.  Then we placed the card over the rim like a lid.  Keeping pressure on the card, we turned the jar upside down and asked the kids what they thought might happen if we released the pressure we were applying to the card and removed our hand.  Some of the kids predicted that the water and card would fall if we removed our hand.  
Some of them had already seen this demo (or so they thought) and predicted that the card would remain in place because of the atmospheric pressure pushing up.
We asked for a BRAVE volunteer that wasn’t afraid to get soaked!  Everyone volunteered.  We picked one and asked him to come stand under the upturned jar.  I removed my hand and he did a little “I told you I wouldn’t get wet” dance.  We asked him to look up at the card and read what it said.  He read it aloud for the group, “DO NOT REMOVE THIS CARD.”  We asked him to predict what would happen if we removed the card.  Everyone agreed that he would get soaked.  We asked him if he was STILL feeling brave.  When he agreed to stay, we removed the card!  A little bit of water leaked out, but the rest of the water remained in the jar!


How could this be?  The secret is a little circle of window screen spanning the jar opening. It’s all about water molecules and how they cling to each other forming "surface tension" – just enough cling, combined with atmospheric pressure to keep the water above the screen.

10 Minutes
You’ve Got Me Under Pressure
To get the kids excited and to demonstrate atmospheric pressure; we brought out an old classic - the pressure mat.  

You just place this rubber mat on a clean flat surface and ask a volunteer to lift the
mat by the handle – straight up – no sliding it off the edge!
It is almost impossible, but YOU can pick it up easily (by the edge – be sneaky).   
The science? Ever heard the expression “light as air”?  

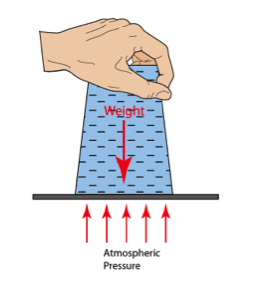
Air isn’t light at all. The air surrounding our planet weighs a lot.
This heavy “sea” of air exerts a LOT of pressure.
The atmospheric pressure at sea level is 14.7 pounds per square inch of surface area.
That’s roughly the weight of 2 gallons of milk resting on 1 square inch!  So, the mat has about 1,620 pounds of atmospheric pressure pushing down on it!

45 Minutes
Honey, I Shrunk the Marshmallows
For this experiment, we used a Fizz-Keeper. Fizz-Keepers are the little pressure pumps designed to keep the fizz in PLASTIC bottles of soda that have previously been opened. 
We filled empty baby soda bottles and 16 oz. bottles about half full
with marshmallows, and screwed on the pumps.

As we began pumping, we quickly noticed how the marshmallows seemed to wrinkle and shrink as the pump forced molecules of air (that pushed on the marshmallows) into the bottle. 
Since marshmallows are mostly pockets of air, the increased pressure compacts the air molecules and the marshmallows shrink.
Then we released the pressure by unscrewing the pump.  It was really cool to see the marshmallows poof back up. When we unscrewed the pump, the air pressure inside the marshmallow bubbles was greater than the pressure pushing on the marshmallow from the outside, so the marshmallows proofed back up.

Safety Notes: This requires adult supervision – preferably a responsible adult! Use only plastic soda bottles that are in good shape. Do not pump more than 40 strokes (pumps) into a 16 oz. bottle. Never leave a soda bottle in a pressurized state.
Apply only enough pressure to allow you to see the shrinking effects.

You think that was cool?  We kicked it up a notch by reversing the process. 

My dad bought a nice (expensive) a vacuum packing food saver
on the way to school just for this experiment.
  My mom rolled her eyes.
You can find cheaper models that will work just fine on the Internet. They are great for exploring the properties of air pressure.
We filled the storage container with marshmallows and removed a lot of the air.
Honey, we blew up the marshmallows!
Please note: No actual marshmallows were harmed during the making of this experiment.
We brainstormed other experiments we could do with the food saver.  We could use a small balloon or a bag of potato chips in place of the marshmallows.  What if we put in soap bubbles, shaving cream, or silly string?  If a Fizz Keeper keeps sodas fizzy, will the food saver make them flat?

20 Minutes
Shrink Wrapped Kids
This also needs adult supervision – try to find a mature one.
Never EVER put a bag over anyone’s head (we said this over and over again, but the kids all knew never to do that)!

We asked parent and child volunteers to step into a BIG plastic bag. We asked them to cup their hand around a vacuum cleaner nozzle that we inserted into the bag (this keeps the bag from being sucked into the nozzle). We tried to create as good a seal as we could just above their shoulders.


We turned on the vacuum, and in a few seconds the unsuspecting victim…
err, I mean volunteer gets shrink wrapped.  It feels CRAZY!
 We explained to the kids and parents that there is no suck thing as suction.  Prior to turning on the vacuum, the bag was filled with air.  The vacuum cleaner removed some of the air, so that there was more air pressure on the outside of the bag.  This allowed the atmospheric pressure to push and mold the bag around our bodies.

We snuck in a little social studies when we talked about how this science helps to package and preserve food by cryovac or shrink-wrap packaging. 

Steve credits Wayne Goates with this demo – the guy who invented the shrink wrap your sweaters as seen on TV. Reference: Wayne Goates. NMLSTA Level Line. "Shrink Wrap With A Vacuum," Winter, 1996.


Science of Air Pressure #1


Every week, Madison (my 10-year old daughter) and I teach a 1.5-hour afterschool science club for K-2nd graders.  Each week she helps plan the lesson and then we write the blog about what we did. 

We learned most of the science experiments and activities from Steve Spangler (awesome speaker and science guy extraordinaire).  We have included links to his science supplies, experiments, and videos.  We also include links to our YouTube videos. These links take you away from the blog and to external websites.

Lesson 4
Science of Air Pressure #1
Science Standards Addressed:
  • Describe the characteristics of the 3 states of matter.
  • Know that air takes up space and exerts a force.


Plus we snuck in some speaking and listening standards like asking questions, expressing ideas, following multi-step directions, and participating in discussions.


10 minutes
As the children arrived we played the songs Something in the Air, by Tom Petty and the Heartbreakers, and Love is Like Oxygen, by Pilot.

We had a snack that once again was a hint of the science to follow.
We snacked on Sponge Bob yogurts.  Get it?  He’s a sponge – filled with air bubbles & he lives under the sea!  OK … we were stretching it with that one.

Madison read the Pearl Diver, by Julia Johnson.
 - a story of a little boy, Saeed, and his father, and what happened when for the first time Saeed accompanied him on one of the long diving expeditions aboard a sambuk - one of the great pearling boats. It describes the often hazardous world of the pearl divers. It is illustrated by Patricia Al Fakhri. Great watercolor illustrations!


10 Minutes Ye Olde’ Egg in the Bottle Trick We began the lesson with something guaranteed to engage their emotions and elicit squeals and cheers. We found a high-quality glass milk bottle 
and replicated a favorite demo from my childhood, but with a new twist we learned from Steve.  See the full experiment! 
- An egg-cellent and egg-citing egg-speriment and demonstration of air pressure! 
We peeled a hard-boiled egg, stuck 3 birthday candles in it, lit them, and stuck the lighted end of the egg into the INVERTED bottle. 
 Some people think the fire burns the oxygen creating a vacuum that sucks the egg into the bottle. Really the fire warms the air – expanding it – forcing air out of the bottle. This is what scientists refer to as a “partial vacuum.” 
When the flame goes out, the molecules of air in the bottle cool down
and move closer together. 

 The air pressure outside the bottle is higher than that inside the bottle.  Normally the air outside the bottle would come rushing in to fill the bottle but, the egg is in the way!
The “push” or atmospheric pressure of the air molecules outside the bottle is so great that it literally pushes the egg into the bottle (defying gravity) to equalize the pressure.
See our YouTube video of the Egg in the Bottle Demo!

 Now how do we get the egg OUT of the bottle?  We could stick a knife into the bottle and chop the egg into pieces small enough to fall out – but that would be MESSY!  So by applying a little scientific reverse psychology, we can push that egg back out.  
We blow air into the bottle, so there is more pressure inside than outside. 
The air inside cleanly deposits the egg right back into my waiting hand.


10 Minutes
The Plunger Demo
It is simple.  Stick your plunger on a flat surface.  
Be prepared for giggles because it might make a FARTING noise! 
It's atmospheric pressure in action.  When you force air out of the plunger, there is less air pressing back from inside than there is pushing from the outside. A great way to show that suction cups stay stuck because of the pushing force of air, not from a pulling "suction" force.

1 Hour
Cartesian Divers – Meet
Hook and Squidy

We found some cool Cartesian diver kits that double as fun toys!


The youngest kids required a LOT of help getting their divers just right. We were so busy helping everyone, we forgot to take good pictures of them playing and having fun with science.

So what IS the science behind this? The classic Cartesian (Ren Descartes, a French scientist and mathematician who used the diver to demonstrate gas laws and buoyancy) diver experiment is set up by placing a "diver"—a small, rigid tube, open at one end, such as an glass eyedropper into a larger container (2-liter bottle) filled with liquid (water). The "diver" is partially filled with a small amount of water, but contains enough air so that it floats at the top (just barely) while being almost completely submerged.

The "diving" occurs when the flexible part of the larger container is pressed inward, causing the "diver" to sink to the bottom until the pressure is released, when it floats again. When the container is squeezed, the pressure is spread through the liquid.

Pascal's Principle - pressure on a fluid is transmitted unchanged throughout the fluid. 
This presses on the air bubble, compressing it and allowing more water to enter - SINK. Reverse – Float.  

Science of Animals

Lesson 7

Science of Animals

Science Standards Addressed:
  • ·      Identify major parts of living things; describe their functions and observe their differences (arms, wings, and legs of animals)
  • ·      Observe and describe similarities and differences in appearance of animals and how they resemble their parents.
  • ·      Observe life cycle patterns of animals.
  • ·      Observe differences within animal families.
  • ·      Observe inherited characteristics in animals (type of fur, number of legs, type of eyes).


My dad was doing a Halloween Science Show at another school, so Mrs. Sanchez was there to help out.

15 minutes
As the children arrived we played the songs Animal Fair, by Laurie Berkner, Five Little Monkeys, by the Learning Station, and How Much is that Doggie in the Window, by Patti Page – hints of the science to come.

Next we had a snack that once again was a hint of the science to follow –
Animal Crackers!
During snack, we talked about how nutrients meet specific needs of our bodies (carbohydrates provide energy, milk has calcium for bones and teeth).

Madison read The Caterpillar and the Pollywog, by Jack Kent
 – about a caterpillar that is always bragging that she will turn into “something else.” This impresses the polliwog.  He wants to turn into some thing else too. He watches the caterpillar turn into a butterfly, but does not notice that he in turning into a frog at the same time.

and The Very Hungry Caterpillar, by Eric Carle
– about a caterpillar who eats and eats until he is too full and too fat to eat any more. The caterpillar builds a cocoon and turns into a butterfly. This book teaches a little bit about the life cycle of a caterpillar.

10 minutes

Animal Name Game
Each person in the team thought of an animal whose name begins with the same letter as his or her first name, or ANY animal if that was too difficult.  Then we went around the circle, introducing ourselves by our animal name and first name.  Anteater Annie, Monkey Mike, Cobra Conner etc. We played again, but this time the challenge was for the first person to say their own name, the second person says the first person’s and their own name, the third person says the first two people’s name and their own name, and so on…until the last person says everyone’s name in order ending with their own name.  

That was too hard for the youngest kids, so the group decided to
say everyone’s name in order out loud – success!
15 minutes
Mission: Classification
We gathered plastic animals from the self-directed science area in the afterschool program: sea life, reptiles, forest animals, snakes, polar animals, Australian animals, farm animals, insects, African animals, spiders, Asian Mountain Animals, even PEOPLE!

First we asked the kids to divide the pile of animals into only two piles based on only one characteristic that they observed.  That totally didn’t work. Instead, the kids just made their own piles with lots of combinations of traits.  So, it worked out OK.

We kept asking them to divide piles into smaller piles – every time based on similarities and differences that they observed. We discussed the similarities that animals from the same family have and their differences from other animal families (sharks vs. whales – reptiles vs. insects). We kept playing until all animals were divided into small animal groups.

Some of the piles included:
Sea Animals
Animals with 4 Legs
Insects

Humans
and even black and white-colored animals.
15 minutes
X-Rays & What’s Inside Animals Cards
We gave them these cards that looked like normal pictures of animals...
until they held them up to the light!  

We explored and observed these cool "x-ray" cards by holding them up to the window and letting the light shine through.
We gave them pieces of an x-ray of the human body and asked them to put it together.
There were a bunch of broken bones x-rays – ouch!
 15 minutes
Life Cycle Game

First, we talked about the life cycles of plant and animals and looked through some life cycle books. The kids knew the egg developed into a caterpillar and the caterpillar developed into a butterfly, but couldn’t remember that the butterfly lays a caterpillar egg to make a CYCLE - Egg, Larvae, Pupa, Adult, Egg - repeat.

We gave each child a plastic or inflatable animal as part of a life cycle.  Their challenge was to form a CIRCLE that correctly represented the life CYCLE of the animal they were given. 
 Then we all switched animals and played again. 
15 minutes
For the last 15 minutes of class we did more work on Sharpie Science t-shirts.
5 minutes
Clean Up


Wednesday, November 3, 2010

Science of the Air


Every week, Madison (my 10-year old daughter) and I teach a 1.5-hour afterschool science club for K-2nd graders.  We learned the experiments and activities from Steve Spangler (awesome speaker and science guy extraordinaire).  Most of the links to the complete descriptions of the experiments and the products we used connect you to his website.  We are not affiliated with this company, but we are raving fans – www.stevespanglerscience.com .

Lesson 3
Science of the Air
Science Standards Addressed:
  • Observe that things (air) move in different ways.
  • Describe the characteristics of the 3 states of matter.
  • Know that air takes up space and exerts a force.
Plus we snuck in some speaking and listening standards like asking questions, expressing ideas, following multi-step directions, and participating in discussions.

See a similar afterschool science lesson that we did in 2009 at

10 minutes
As the children arrived we played the songs Something in the Air, by Tom Petty and the Heartbreakers, The Air that I Breathe, by the Hollies, and Love is Like Oxygen, by Pilot.


Next we had a snack that once again was a hint of the science to follow.  We snacked on Rice Krispie Treats (both the rice cereal and the marshmallows have many tiny pockets of air). While we ate snack we asked the kids to “describe the properties” of the treats.  They had some difficulty coming up with describing words that didn’t have anything to do with how they TASTE!  So, we asked them to pretend that they had to describe these treats over the phone to an alien from outer space that did not eat food and had no sense of taste.  Now they started using words like sticky, tan, gooey, bumpy, etc.  They described the many bubbles, which led to the question, “What is inside bubbles?” Air! We asked them to predict what the topic might be.

While we ate, Madison gave us another hint and snuck in some English Language Arts by reading Gilberto and the Wind, by Marie Hall – a story about Gilberto and his friendship with the wind.  The wind can be mean or nice; it takes Gilberto’s toys away, but also plays with bubbles and gives him an apple.


Then Madison read The Wind Blew, by Pat Hutchins – a story about a town where the wind took an umbrella, a balloon, a hat, a kite, a wig, and even more things. Then dropped them down again.


Waterproof Paper Challenge:  We gave the kids the challenge of dunking a wad of paper towel COMPLETELY under water for 10 seconds and keeping the paper towel COMPLETELY dry – using only a small cup and a piece of tape. The kids eventually discovered that if they taped the wad of paper towel to the bottom of the cup and submerged it upside down into the water, the bubble of air trapped inside the cup separates the paper towel from the water and keeps the wad from getting wet – having no way to escape the air kept the water from entering.  Now - tilt the glass while under water – what happens? See our afterschool Waterproof Paper Engineering Challenge Video on You Tube

Impossible Bottle: We slipped a balloon inside the neck of a special bottle (Impossible Bottle) and stretched the mouth of the balloon over the top of the bottle.  A volunteer tried to blow up the bottle, but the balloon won’t inflate because the bottle is already filled with air and there’s NO room for the balloon to expand.  Then we removed the stopper that plugged a second hole in the bottle.  This time the volunteer could easily blow up the balloon since as the balloon inflates it pushes the air in the bottle out the escape hole.  Then when we replace the stopper, the outside air can’t get back in so the balloon STAYS inflated.  LOTS of “Woa’s” and “Wow’s” from the kids at that little trick of science! Full Experiment Description


Huff ‘n’ Puff Challenge: We gave the kids an “empty” 1L soda bottle and a small wad of paper towel.  They placed the small wad of paper towel into the neck of the bottle.  Their challenge was simply to blow the wad of paper INTO the bottle.  Remember the bottle is not empty, but is COMPLETELY filled with AIR (takes up space and exerts force)!  This definitely falls into the harder than it looks category! As you blow air into the bottle, you force the air that was already in there to blow out the only place it can escape.  This escaping air blows the paper ball OUT! Try blowing hard or soft.  Try blowing close to the bottle or further away.  What do you think would happen if instead of a loose, pea-sized ball you made a more compact spit wad?  What if the opening was bigger?  What if you created another escape hole? See our afterschool Huff 'n' Puff Challenge Video on You Tube

Bubble, Bubble, Toil and Trouble
Bubbles are great ways to explore air and talk about the three states of matter: solid, liquid, gas. What is a bubble? A bubble is air or another gas surrounded by a thin liquid film of soapy water surrounded by more air.  The thin film of soapy water forms three layers – a thin layer of water sandwiched between two layers of soap molecules.  On both sides of the layer of water, soap molecules orient themselves so their water-loving (hydrophilic) heads face the layer of water and their water-fearing (hydrophobic) feet extend away from the water.

What causes bubbles to pop? Among other things, rough edges and the oils in our skin. So we gave the kids gloves to wear so they could actually touch, hold, and examine the bubbles.


Bubbles form because of the surface tension of water – positively-charged hydrogen atoms in one molecule attracted to the negatively-charged oxygen atoms in another molecule. The molecules cling together to enclose the maximum amount of air with the minimum amount of bubble solution. Bubbles become spheres because it is the shape that requires the least energy to form. But we used the stick and ball connectors called ZOME to construct bubbles with forms in shapes like cubes, pyramids, bananas, spirals, flowers, and even a dodecahedron!


Vortex Generators.  Steve’s signature grand finale is shooting giant smoke rings (See his video and description here), so this was the afterschool science club grand finale too!  First we bought a cheap 5-gallon bucket, cut a hole in the bottom and fastened a piece of a cheap clear shower curtain over the top with a bungee cord.  We have the kids put Styrofoam cups on their heads and we blow them off doughnuts of air created by this small vortex generator – they LOVE it!  Then we kick it up a notch and take things outside with the big smoke ring generator made with a large garbage can and the rest of the cheap shower curtain.


We ignite a smoke bomb (the little ones they sell at fireworks stands) and place the hole in the trashcan over the smoke bomb so that smoke fills the trashcan.  Then we gently tap the shower curtain and send cool smoke rings out over the cars of parents arriving to pick up their kids.  


Ta dah!
Follow mikeafterschool on Twitter