Monday, December 21, 2015

5 Ways to Motivate Kids to Learn Math!

For most kids, math can be a total bore.  This year I taught I an after-school math class called Dramatic Math, and my goal was to make a math class that I would have loved to gone to.  Here are some ideas we came up with to make math fun and exciting.

1. Warm Up to Math!
After spending all day in class, the last things kids want to do is sit down and do some math problems. So we always start with a math warm-up exercise.  A math warm-up example:


16 Shakedown -Shake each limb starting with arms and going down to the leg sixteen times.   And count together.  Then ask what half of 16 is.  8! Perfect, now shake every limb 8 times.  Now what is half of 8?  4, of course!  Shake every limb 4 times.  Keep going to till you get down to 1!

2.  Make it a Game!
Kids love challenges, strategies, and games.   A math quiz SHOW is always going to be better than a plain math quiz.  Plus, it’s a great way for kids to interact in groups.

  
3. Keep it Physical!
Lots of people think math is just a lot of worksheets and written problems. I always like to give physical challenge to test kids bodies as well as their minds.  Examples include:


Division Exercise – Break kids in to groups of 2-6 depending on how hard you want their math to be.  Then challenge to do something ridiculous like 120 push-ups, but also let them know that they can divide 120 by the amount of people in their group.  This also works great with crunches, jumping jacks, and running.

4.  Make it Hands On
A lot of the problem with math is it very abstract and hard to understand when if you can’t see it or touch it.  That’s why we try to let kids interact with math in a tactile way such as making a lemonade stand where they have to use money to and make transactions.


 5.  Keep it Dramatic!
Our math class was called Dramatic Math because wanted to tell a story with the math.  One of the ways was having the kids come up with sketches or even movie ideas that involved math.  We did an Indiana Jones type movie trailer where kids going into a candy cave and have to solve math problems!


By Chris Walsh


Tuesday, December 15, 2015

5 Steps To Rocking a Twinkle Light Parade

1.     Start with an Idea:

Children’s Choice participating in the Twinkle Light Parade came from Carmen our John Baker site director. Inspired by wanting families and kids and staff alike participating in this fun parade she had the had the idea of a How the Grinch Stole Christmas inspired float and spread the word to our site directors. 


Once our site directors were on board, and a list of the float rules and requirements was acquired and registration fees were paid. We were on the road to rocking the Twinkle Light Parade.
 
2.     Build an Awesome Float


Essential to any great parade is to have fantastic parade float.  You gather the troops and brain storm an idea of what would be the most visually striking on the parade route.  Our float was an homage to the town of Whoville in the How the Grinch Store Christmas.  A backdrop of the town was created along with a  lit Christmas tree.  Our parade allowed people on the float, so we made Whoville come to life with a singing Cindy Lou Who and a Grinch who was waving to the parade goers with Max by his side.
 
3.     Bring Awesome People on Board


You can’t rock any parade without awesome people to celebrate with. We at Children’s Choice are lucky to have such fun loving families and staff that the invitation was made open to anyone to come join us the day of the parade. We posted invitations at all of our sites and spread the word to our staff.  People came out to help build the float leading up the parade as well as show up the day of the parade to help with make up, costumes and general prep for the float. We had a wonderful turn out for our first parade.
 
4.     Get Your Twinkle On


We had a simple criteria if anyone wanted to join our float . they had to be ‘Twinkled Out’ on the day of the parade.  Since our theme was Whoville we encouraged our staff to channel their inner Dr.Suess and come in costume if they were able. If not, that was okay. 


We had a mix of families in Christmas Sweaters with twinkle lights,  suits with glow sticks taped on, Santa hats, people even brought their four legged friends decked out for the holiday. Everyone received a glow stick in a balloon to twinkle along the parade route or twinkle lights as they walked behind our already sparkling float.
 
5.     Bring the Spirit of the Season (& Comfy Shoes)


The twinkle light parade is an even that preps our city for the holiday season.  It’s a time to bring families together with members of the community to share a wonderful time of year. Our staff was on hand selling hot chocolate to parade goers.  Families and Staff that walked the float route  got to know each other while waving to parade watchers. We sang carols and members of our parade crew passed out candy to families we passed along our way.  It was great to have kids notice us from the sidelines and the community recognizes our organization. It was such a great night that the two mile walk seemed to end so quickly. 
 
If you’re interested in help Children’s Choice with our float next year, sign up for our mailing list www.childrens-choice.org.
 

Tuesday, October 27, 2015

Survival: Shelter, Skills, & Stew

In this club, the children were encouraged to think about what life would be like in the desert environment without modern tools, food services, and shelters.


The group began by designing tools that could aide them in hunting and gathering. After carefully considering the options based on food available and environmental conditions, the children then made their designs came to life.


They collected materials found in the environment and assembled them together to form larger tools. This was day one of the club, on day two the children were asked to consider what they might need in order to build a shelter that would protect them from the harsh New Mexico Sun and flash flooding common to the area. On day three the children continued working on their shelters but something had begun to change in the way the children thought of their shelters. What began as independent shelters quickly changed into community shelters as the children became aware of what the other survivalists had to offer with their individual environments.


Day four of the club was a day of food preparation for the big survivalist feast, but there was a catch! The only tools available to the children in order to chop the vegetables for their vegetable stew were large stones that had been collected outside.


Upon surveying several children, it was found that this was their favorite day of the club. Some said it was the feeling of smashing the stone onto the tough produce while others enjoyed the strong food smells, whatever the case, these children worked hard to put themselves in the mindsets of early New Mexican settlers and enjoyed the reward of building everything for themselves and for their community of survivors. 


By Lisa Audette 

Friday, October 23, 2015

Advocacy & Recycling

Don't know what to do with those old, inefficient incandescent light bulbs that you replaced with more efficient CFLs and LEDs.

Lights On Afterschool is a nationwide event celebrating afterschool programs and their important role in the lives of children, families and communities. 


To draw the attention of parents and educators and advocate for the importance of afterschool programs, this year for Lights On Afterschool one of our schools decided to have a lightbulb gallery! The kids spent the afternoon painting lightbulbs with glass paint and displaying them for families to see. The kids loved that they looked like hot air balloons to represent New Mexico!


Things you'll need:

1.Any glass light bulb
2.Glass paint and markers ( from craft store)
3.Air dry clay 


Don't bake the lightbulb a as the paint instructed as it makes glass explode! Place light bulb in clay before they star paining to hold as a base and start painting. Let dry at least 4 hours!

By Sarafina Nagle

Thursday, October 22, 2015

Experiment: Edible Energy Explosion

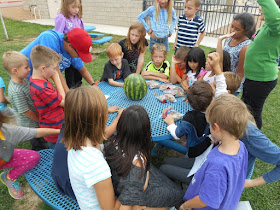
Our own Fruit Ninja in Training (Ryan age 6) had a question. Can the force and pressure of a lot of rubber bands wrapped around of the middle of a watermelon really make the watermelon explode?  If so, how many rubber bands would it take to make a watermelon explode?  The guesses ranged from 50-1,000 and we recorded all of the opinions of the children on a piece of paper.


We started our experiment by placing rubber bands around the middle of a watermelon. The kids helped to count the rubber bands as the staff stretched them around the watermelon. We started out placing five rubber bands at a time and were able to practice counting by 5s (to sneak in a little math). After 200 rubber bands were on, we began placing the rubber bands by the 10s. After we hit 500 rubber bands, we had to go back inside and look for more!


As the experiment continued, the watermelon began to ooze bubbles and juice out of where the stem had originally connected the watermelon to the plant. 


Then the watermelon began to crack slowly, and as we placed the 558th rubber band on the watermelon, it popped! Watermelon showered everywhere like rain and the pieces ranged from baseball sized pieces to mist.

Rubber bands are great examples of potential vs. kinetic energy. When they are stretched, they are full of lots of potential energy (stored energy). When they snap back, this potential energy is converted into kinetic energy (energy in motion), and... boom! Watermelon shower!


The kids really enjoyed this experiment and thanked Ryan for sharing it with the community. Next time we want to try different sized watermelons and see how the watermelon size affects the number of rubber bands needed.

By Erik Wolf

Wednesday, October 21, 2015

Jim Dine Hearts

Jim Dine (1935), is an American Pop Artist and Abstract Espressionist who is known for his colorful and iconic painting of robes and hearts. He is considered an important figure in Neo-Dada and a forerunner of Neo-Expressionism. He is the undisputed King of Hearts. He paints, prints, draws, and sculpts them. When asked how many hearts he has made, he responded, “Millions… I have not idea but it’s mine and I use it as a template for all my emotions. It’s a landscape for everything.”


In this art class, we showed the students an example of a Jim Dine heart painting.
We asked them, “What colors were in used in the art.  How does it make you feel?”  Then we told them that we were going to do our own version of the heart picture.

Materials needed:
·      Paper
·      Crayons
·      Pencil
·      Watercolors
·      Water
·      Brushes

We first showed the students how to draw a big heart on their page with pencil.  Then we had them trace over the pencil with crayon.  Once their heart was drawn, the students then used watercolors to fill in the heart.  We had them think about the colors inside the heart, and outside and asked how they wanted them to contrast.  


Here are their heart-filled results.


Wednesday, October 14, 2015

Beyond Books and Beverages

We think the experiences of older kids should be special. They have unique needs and wants and deserve activities designed specifically for their age group. Their voices need to help drive the design of their own programming. Older kids should have experiences that are different than those of the younger kids.

In our Older Kids Club, they are involved a mix of service learning projects like fundraising for our local animal shelter and helping the younger kids with homework that teach a sense of community and activities that are just plain fun like making our enjoying special snacks and pet rock creations while hanging out in the Older Kids only area of our community.


This month, our Older Kids Club surveyed the younger kids in the program about books they would like to read.  We took a field trip to the local Barnes and Noble, first stopping at the bookstore café for some grown up Starbucks beverages. Then we spent some time picking out books from the younger kids’ wish list. “I really liked this book we picked out, it was called I SPY, ” said Teagan.   They were given a budget and had to experience the democratic process in action by taking a few votes to decide on which books to purchase. “I suggested Mal’s Spell Book and it has some spells in it.  I think it is good for older kids and some younger kids that can read really well,” said Kahlo.


Later this month we will continue a Sombra Older Kids Club tradition by constructing a Haunted House.  Families are invited to tour the attraction with their children during our Family Night, October 30th. 

Tuesday, October 6, 2015

Apples, Acids, & Bases

Sometimes the best curriculum ideas come not from prior planning, but spontaneously following through on the expressed interests of kids. After making a HUGE mess playing with the ink inside a broken pen, this curious group came to me to plead their case.  With straight faces and genuine sincerity they said, "But Carmen, we were EXPERIMENTING!  We like to experiment."  

So the next day we experimented with ACIDS and BASES.  
First we had to think like scientists.  We had to have a question.  We did a little research online and found an experiment we wanted to try.  We learned from our research that apples and other fruit can turn brown when cut open and enzymes inside of the fruit are exposed to oxygen and react with an iron or copper cofactor in the fruit. The apple oxidizes... so it is a little bit like an edible rust on the fruit.

Our research question: What will keep apples from turning brown, an acid or a base?

Our hypothesis: We thought the apple treated with a base (baking soda specifically) would turn brown first.

Materials:
  • 5 apple slices
  • 5 canning jars with lids
  • Vinegar (or dilute acetic acid)
  • Lemon juice
  • Water
  • Baking soda dissolved in water
  • Solution of Milk of Magnesia and water
Procedures:
  1. We added a slice of apple to each jar.
  2. We poured enough of each liquid into the jar to completely coat the apple slices
  3. We put the jars on a white board and labeled each space.
  4. Then we made a guess about which one would keep the apples looking the freshest.  
  5. We made our hypothesis and wrote it down.  We watched our experiment for 2 days then unveiled our apples!  
Results: Our hypothesis was supported. The apple slices in the acids (lemon juice and vinegar) did not get brown as much as the apple slices in the bases (milk of magnesia and baking soda water) or our control (plain water).

by Carmen Prince-Morris

Saturday, September 5, 2015

Sam the Worm: A Teambuilding Activity

August was all about getting to know each other, the staff and our environment. One of our favorite activities was Saving Sam!

The Challenge:
Sam is our friendly neighborhood gummy worm.


While on an ocean adventure, Sam's boat (the plastic cup) capsized and his life jacket (the Lifesaver Candy) is floating underneath it. Working as a team, the kids had to get Sam and his life jacket in the boat without touching him. The only tool they could use/touch was a straw.

Oh, and Sam can't fall in the water at any time because he CAN'T SWIM!

But Sam had no need to worry, because our team of bright engineers put their heads together and found a way to save the day. They had to use some very important tools to accomplish this goal: listening, patience, teamwork, cooperation and above all they had to remember that it was OK to make a mistake, start over, and learn from their peers.


Sunday, July 12, 2015

Fun for the Zoo: Engineering Enrichment and Enhancement.

In our Fun for the Zoo class, student “fungineers” are challenged to invent enrichment items that provide stimulation, challenge, and novelty to enhance the behavioral, physical, social, cognitive, and psychological well being of zoo animals.


In the wild, animals must forage or hunt for food, and protect themselves against predators, but in the zoo, most of their needs are provided for by the keepers.

So, enrichment must be provided to alleviate boredom and stimulate the animals. Environmental and behavioral enrichment for zoo animals is all about stimulating them to investigate and interact with the environment. This keeps animals mentally and physically fit.

Sensory enrichment is designed to stimulate the animals’ sense of smell, touch, hearing, vision, and taste and elicit natural behaviors from the animals. We do this by introducing objects, smells, and “toys”. We provide novel textures such as straw, blankets, burlap, and cardboard.


We decorate toilet paper and paper towel tubes.


Then the keepers put novel scents such as spices or perfumes into the tubes for reptiles and rodents to experience and explore.

One of our favorite activities involves creating food puzzle feeders.  To get the food animals must use their species-typical and time-consuming behaviors like foraging, hunting, problem-solving to think and work and solve the puzzle to obtain the food


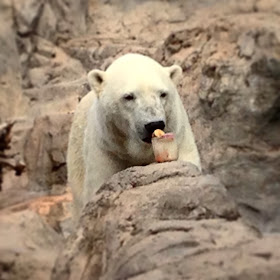
We cut up trout, apples, and carrots (provided by the zoo nutritionists) and froze them in buckets of water.


The polar bears had to spend time getting through the ice to get to the good parts of these tasty “food-sicles”


We made lots of paper mache’ food puzzle piñatas. We painted some like pumpkins (with non-toxic orange paint) for a Halloween gift to the chimpanzees. The keepers put delicious grapes inside and the primates had to discover how to get the juicy treats out of the pretend pumpkins.


We painted some red, white, and blue for the Mountain Lions to have a similar (but meatier) experience on the 4th of July.


We created some nesting bowl food puzzles for the elephants made of plastic bowls, PVC pipes, and bungee cords.


The keepers put a favorite elephant treat (Fruit Loops) inside and the elephants had to reach through an opening into the elephant barn and pull on the bungee cords to release the treats.

This is a great idea other afterschool programs can replicate all across the country. This class creates a partnership with the education department of the local zoo, and builds upon student science and engineering knowledge and skills. This class produces a great service learning experience for the kids. This class is enriching the lives of our zoo animals, by ensuring that the animals have a stimulating life with opportunities to engage in natural behaviors, make choices and exercise control over their environment. It is all about environmental engineering enrichment and enhancement that leads to healthier, happier animals (zoo animals and human animals).